Table of Contents
ToggleTar roofs, also called built-up roofing (BUR), have protected low-slope and flat structures for over a century. They’re tough, affordable, and surprisingly repairable when damage strikes. But a small blister or crack left unchecked can turn into a ceiling stain or rotted decking in one heavy rain. The good news? Most tar roof repairs are within reach of a confident DIYer with a weekend, the right materials, and a respect for working at height. This guide walks through identifying damage, deciding whether to patch or replace, gathering what you need, and executing a watertight repair that can add years to your roof’s service life.
Key Takeaways
- Tar roof repair is cost-effective and repairable for localized damage under 10% of the roof surface using proper mastic, fabric reinforcement, and layering techniques.
- Common tar roof damage includes blistering, cracking, alligatoring, ponding water, and flashing failures—each requiring different repair strategies based on severity.
- Repair your tar roof when it’s under 15 years old with sound decking, but plan for replacement if the roof exceeds 20 years or shows widespread deterioration.
- Essential materials for tar roof repair include roofing cement, fiberglass mesh, cap sheet, and proper safety gear; work on cool, dry days between 50°F and 85°F for best results.
- Always locate leaks from inside first, clean and dry the repair area thoroughly, and apply a two-ply patch with sealed edges to prevent water penetration for 3–5 additional years of service.
Understanding Tar Roofs and Common Damage
Tar roofs consist of alternating layers of bitumen (asphalt or coal tar) and reinforcing fabrics (fiberglass or organic felt), topped with gravel or a cap sheet. They’re built up on-site, hence “built-up roofing”, and create a monolithic, waterproof membrane. You’ll find them on garages, commercial buildings, and older homes with low-slope roofs (pitch under 3:12).
Common damage types include:
- Blistering: Trapped moisture or air pockets under the top layer, caused by poor installation or inadequate ventilation. Blisters feel spongy underfoot and can rupture, exposing underlayers.
- Cracking and alligatoring: UV exposure and thermal cycling cause the bitumen to dry out and crack in a scaly pattern. Surface cracks may not leak immediately, but they let water penetrate over time.
- Ponding water: Low spots where water sits for more than 48 hours after rain. Chronic ponding accelerates membrane breakdown and invites leaks.
- Flashing failures: Edges, penetrations (vents, chimneys), and parapets rely on metal or fabric flashing embedded in tar. Movement, corrosion, or poor adhesion creates gaps.
- Gravel displacement: Missing gravel exposes the bitumen to direct UV, speeding deterioration.
Asphalt flat roof repair shares many of these same issues, since asphalt is the most common bitumen used in modern BUR systems. Identifying the damage type guides your repair strategy, some need patching, others require cutting and rebuilding layers.
When to Repair vs. Replace Your Tar Roof
Not every leak means a full tearoff. Tar roofs are designed for incremental repair, but there’s a tipping point.
Repair makes sense when:
- Damage is localized to a small area (under 10% of total roof surface).
- The roof is under 15 years old and still has multiple layers intact.
- Decking underneath is sound, no soft spots, rot, or sagging.
- You’ve identified a clear cause (storm damage, flashing gap) rather than widespread failure.
- Budget is tight and the repair buys you 3–5 more serviceable years.
Consider replacement if:
- Widespread alligatoring, multiple leaks, or persistent ponding across large sections.
- The roof is over 20 years old (typical BUR lifespan is 15–30 years depending on climate and maintenance).
- Interior damage (ceiling stains, mold, compromised insulation) suggests long-term leakage.
- You’re adding multiple layers of patch upon patch, building codes typically limit BUR to two or three plies total before requiring removal.
- A roof inspection reveals decking damage that requires structural work.
For major work or if you’re unsure of the decking condition, hiring a licensed roofer is worth it. According to flat roof cost data, full replacement runs $4–$13 per square foot depending on materials and region, while targeted repairs cost a fraction of that. Pull a permit if local codes require it, structural repairs and re-roofing almost always do.
Essential Tools and Materials for Tar Roof Repair
Gather everything before you climb. Tar work is messy and time-sensitive once you open a container.
Materials:
- Roofing cement or mastic: Trowel-grade asphalt in 1- or 5-gallon pails. Brands like Henry or Karnak are common: choose fibered (contains fibers for reinforcement) for structural patches.
- Roof patch fabric: Fiberglass mesh or polyester reinforcing fabric, sold in rolls. Provides tensile strength under the tar.
- Cap sheet or roll roofing: Mineral-surface roll roofing (90 lb. or heavier) for larger repairs. Cut to size and embed in mastic.
- Roofing nails: Galvanized 1-inch or 1¼-inch with large heads, if mechanically fastening a patch.
- Gravel or coating: Match existing surface, loose gravel, aluminum roof coating, or elastomeric paint for UV protection.
- Mineral spirits or degreaser: For cleaning old tar and prepping the surface.
- Primer (if needed): Some mastics bond better over primed surfaces, especially on aged, oxidized tar.
Tools:
- Utility knife with hooked blades: For cutting blisters, trimming fabric, and scraping.
- Trowel or putty knife: 4- or 6-inch for spreading mastic. A notched trowel helps with thick applications.
- Stiff brush or broom: Surface prep, sweep away gravel, dirt, and loose material.
- Caulk gun (optional): For tube-style roof sealant around small cracks or flashing.
- Roof brush or roller: For applying coating or primer.
- Propane torch (advanced): If you’re heat-welding cap sheet or softening old tar. Use with extreme caution, open flame on a roof is a fire hazard. Not recommended for beginners.
- Ladder, roof brackets, and fall protection: Never work alone. Use a sturdy extension ladder, and consider a safety harness if the pitch or height warrants it.
Safety gear (non-negotiable):
- Work gloves: Nitrile or rubber, tar is sticky and contains solvents.
- Safety glasses: Scraping and cutting throw debris.
- Respirator or N95 mask: Asphalt fumes and dust from old tar.
- Knee pads: You’ll be kneeling on gravel and hot membrane.
- Long sleeves and pants: Protect skin from tar and UV.
Work on a cool, dry day, ideally 50°F to 85°F. Tar becomes brittle in cold and too runny in extreme heat. Avoid windy days: loose fabric and gravel are a pain to manage.
Step-by-Step Tar Roof Repair Process
Locating and Assessing the Damage
Water rarely leaks straight down. Start inside: note ceiling stains, then measure their distance from two walls. Head to the roof and translate those measurements, adding a few feet upslope, water travels along rafters and decking before dripping.
Once on the roof, inspect systematically:
- Walk the surface carefully. Feel for soft spots, which indicate saturated insulation or compromised decking. Mark them with chalk or tape.
- Check flashing and penetrations first. Vents, chimneys, and roof edges are the most common leak sources. Look for gaps, rust, or lifted edges.
- Examine blisters. Press gently, if it’s spongy and full of water, it needs opening and drying. If it’s dry and intact, you may leave it or slit and seal it preventively.
- Identify cracks and alligatoring. Run your fingers over suspect areas. Shallow surface cracks may only need coating: deep fissures that expose felt or decking require a patch.
- Note ponding zones. If water’s been sitting, the membrane may be delaminated or the decking sagging. Address drainage before patching, or the leak will return.
Many homeowners find guidance from trusted resources like Angi helpful when assessing whether damage requires professional evaluation. Document everything with photos, it helps if you need to call in a pro or file an insurance claim.
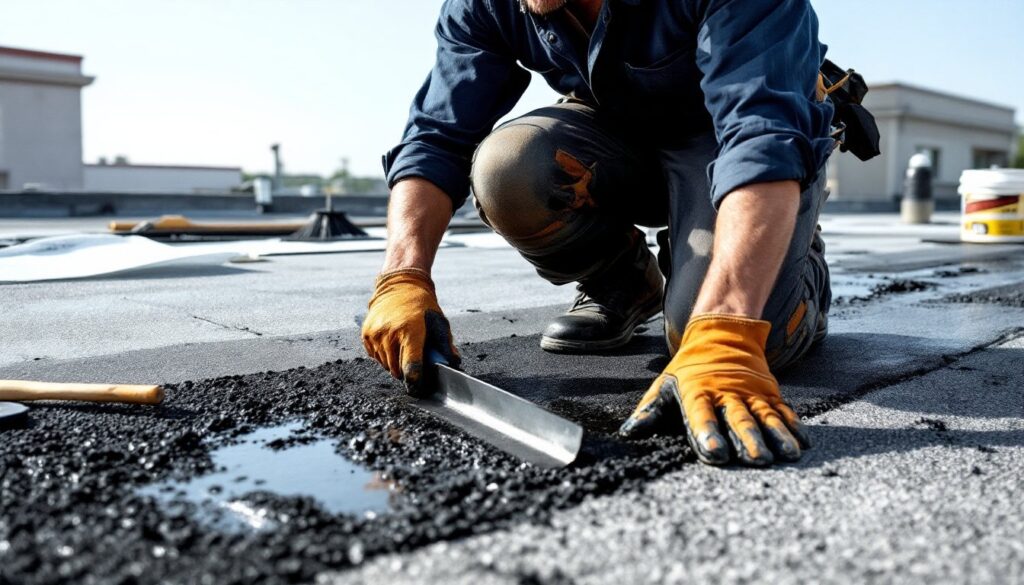
Applying the Repair and Sealing
Once you’ve pinpointed the damage, it’s time to fix it. The process varies slightly by damage type, but the principles are the same: clean, dry, reinforce, seal.
For small cracks (under 1/4 inch):
- Clean the area. Sweep away gravel in a 12-inch radius. Scrub with a stiff brush and mineral spirits if the surface is dirty or oxidized. Let dry completely.
- Apply roof sealant. Use a caulk gun or trowel to fill the crack with roofing cement, working it into the gap. Feather the edges.
- Embed fabric (optional but recommended). Press a 6-inch-wide strip of fiberglass mesh into the wet cement, then trowel another layer over top. This prevents the crack from reopening.
- Top-coat. Once tacky (usually 1–2 hours), apply a thin layer of aluminum roof coating or scatter gravel to match the existing surface.
For blisters:
- Cut an X through the blister with a utility knife, stopping at the felt layer below. Don’t cut all the way through to decking.
- Peel back the flaps and inspect. If there’s water, blot it with rags and let the cavity dry for several hours (or use a heat gun on low, carefully).
- Apply mastic inside the cavity, then press the flaps back down. Nail the edges with roofing nails spaced 2 inches apart if the blister is large.
- Cover with a patch. Cut a piece of cap sheet or heavy roll roofing 6 inches larger than the repair area on all sides. Trowel mastic over the blister and surrounding area (about 3 inches beyond the cut), then press the patch down firmly, working out air bubbles. Nail the perimeter if needed.
- Seal the edges. Trowel mastic around all edges of the patch, feathering it out. Top with coating or gravel.
For larger damaged sections (over 1 square foot):
- Cut out the damaged area in a square or rectangle, removing all deteriorated layers down to sound material or decking. If decking is soft, that’s a structural issue, stop and call a professional.
- Dry-fit a piece of roll roofing cut to fill the hole, then remove it and set aside.
- Spread a thick layer of roofing cement in the hole and over the edges of the surrounding membrane.
- Press the patch in place, smooth it, and nail the perimeter every 2–3 inches.
- Apply another layer of mastic over the entire patch, extending 6 inches beyond all edges.
- Add a second patch (6 inches larger on all sides than the first), embed it in mastic, and seal the edges. This two-ply repair mimics the original BUR layering.
- Finish with coating or gravel.
Pro tip: If you’re working on a gravel-surfaced roof, save the gravel you remove and press it back into the final mastic layer while it’s still wet. This protects the repair from UV and blends it visually. Advice from experts at Bob Vila often emphasizes matching the finish to the existing roof for both performance and aesthetics.
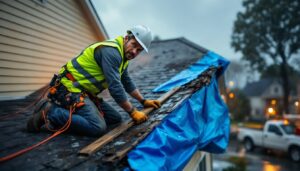
Allow the repair to cure per the product instructions, typically 24–48 hours, before heavy rain. If weather threatens, tent the area with a tarp weighted down (don’t nail through fresh work).
Conclusion
Tar roof repair isn’t glamorous, but it’s one of the most cost-effective ways to protect your property and postpone a major expense. With the right approach, clean prep, quality materials, and a methodical layering process, a weekend patch can deliver years of dry, trouble-free service. Inspect your roof twice a year, keep drains clear, and address small problems before they grow. When in doubt, don’t hesitate to bring in a licensed roofer for structural concerns or complex flashing work.