Table of Contents
ToggleLeaky ducts can quietly drain up to 30% of your heating and cooling energy before conditioned air ever reaches your living spaces. That inefficiency translates directly to higher utility bills and uneven temperatures room to room. Most duct leaks occur at joints, seams, and connections, spots where sheet metal meets flex duct or where branch lines split off from the main trunk. The good news? Many HVAC duct work repair tasks fall well within the DIY skill range, requiring little more than mastic sealant, foil tape, and a methodical approach to tracking down trouble spots.
Key Takeaways
- Leaky HVAC ducts can waste up to 30% of conditioned air, directly increasing utility bills and creating uneven room temperatures—watch for signs like higher energy costs, whistling sounds, and visible dust streaks.
- Most accessible HVAC duct repair tasks can be completed as DIY projects using mastic sealant and UL 181-rated foil tape, keeping material costs under $100 compared to $450–$2,000 for professional repairs.
- Proper duct repair requires clean surfaces, correct materials (avoid cloth duct tape), and attention to root causes—such as pest damage or poor installation—to prevent the same problems from recurring.
- Re-insulation with R-6 minimum duct insulation is essential after sealing to restore efficiency in unconditioned spaces like attics and crawlspaces.
- Call a professional HVAC contractor for inaccessible ducts, extensive mold, asbestos-wrapped insulation, or major redesigns that require specialized equipment and load calculations.
- Annual inspections of accessible ductwork, prompt filter changes, moisture control, and pest-proofing entry points prevent future duct damage and maintain long-term system efficiency.
Signs Your HVAC Ducts Need Repair
Recognizing duct problems early saves energy and prevents minor issues from escalating. Watch for these indicators:
Higher-than-normal utility bills without a corresponding change in usage suggest the system is working harder to compensate for lost air. Compare current bills to the same season last year.
Uneven room temperatures mean certain spaces receive less airflow. Check if distant rooms stay warmer in summer or colder in winter than rooms near the air handler.
Whistling or hissing sounds during system operation point to air escaping through gaps or tears. These noises often intensify when the blower first kicks on.
Visible dust streaks along duct seams or near registers indicate air leakage pulling in attic or crawlspace dust. Inspect accessible ductwork in basements, attics, and garages.
Excessive dust accumulation on furniture and surfaces can signal return-duct leaks drawing in unfiltered air from wall cavities or attics.
Perform a simple hand test: with the system running, hold your hand near duct joints and seams in accessible areas. You’ll feel escaping air if a leak is present.
Common Causes of Duct Damage
Understanding what damages ductwork helps target repairs and prevent repeat issues.
Age and material degradation top the list. Flex duct typically lasts 15 years: sheet-metal ducts can go 25 years or more, but connections and sealant dry out over time.
Poor initial installation accounts for many problems. Undersized ducts, inadequate support straps, or insufficient sealing at joints all create weak points. Building codes (IRC M1601) specify duct support intervals, but older systems may predate those standards.
Pest activity can puncture or tear flex duct. Rodents chew through insulation and plastic vapor barriers seeking nesting material.
Settling and structural shifts stress connections. As a house settles, duct runs pull apart at joints, especially where rigid and flexible sections meet.
Physical damage from stored items in attics or crawlspaces, or from trades working nearby, creates holes and crimps that restrict airflow.
Condensation and moisture corrode sheet-metal ducts over time, particularly in humid climates or where insulation is missing. Rusty seams and pinholes develop gradually.
Identify the root cause before repairing: otherwise, the same problem recurs. If rodents created the damage, address the infestation before sealing ducts.
Tools and Materials You’ll Need
Gather these supplies before starting to avoid mid-project trips to the hardware store.
For leak sealing:
- Mastic sealant (water-based duct mastic, not drywall compound)
- Foil-backed tape (UL 181-rated: never use cloth duct tape)
- Fiber-mesh tape for larger gaps before applying mastic
- Disposable gloves and old paintbrush or putty knife for applying mastic
For structural repairs:
- Sheet-metal patches or aluminum flashing for holes larger than 2 inches
- Self-tapping sheet-metal screws (#8 × ½-inch)
- Duct insulation (R-6 or R-8 foil-faced fiberglass wrap)
Tools:
- Flashlight or headlamp (attics and crawlspaces are dim)
- Tin snips for cutting patches or trimming damaged sections
- Cordless drill with magnetic bit holder
- Utility knife for trimming flex duct or insulation
- Wire brush for cleaning rust or debris before sealing
- Respirator mask (N95 minimum) and safety glasses, attic dust and fiberglass insulation are irritants
Skip the cloth “duct tape” even though its name: it fails within months in HVAC environments. UL 181-rated foil tape and mastic are the only sealants recognized by code for duct systems.
Step-by-Step Guide to Repairing Duct Leaks
This process works for most accessible residential duct repairs. If ducts run inside walls or under concrete slabs, call a professional.
Locate the Leaks
- Turn on the system and set the thermostat to call for heating or cooling.
- Inspect accessible ductwork in the attic, basement, or crawlspace with a flashlight. Look for visible gaps at seams, disconnected joints, and tears in flex duct.
- Hold your hand near suspected leaks to feel air movement. Alternatively, light an incense stick and watch for smoke disturbance near joints.
- Mark problem spots with painter’s tape or a marker so you don’t lose track while gathering materials.
Prepare the Surface
Proper HVAC repair and maintenance starts with clean surfaces. Dirty or oily ducts prevent sealant adhesion.
- Turn off the HVAC system at the breaker for safety.
- Use a wire brush or rag to clean dust, rust, and debris from the area around each leak.
- If insulation covers the damaged section, carefully peel it back and secure it out of the way with wire or string. You’ll reattach or replace it after sealing.
Seal Small Gaps and Seams
For gaps under ¼ inch:
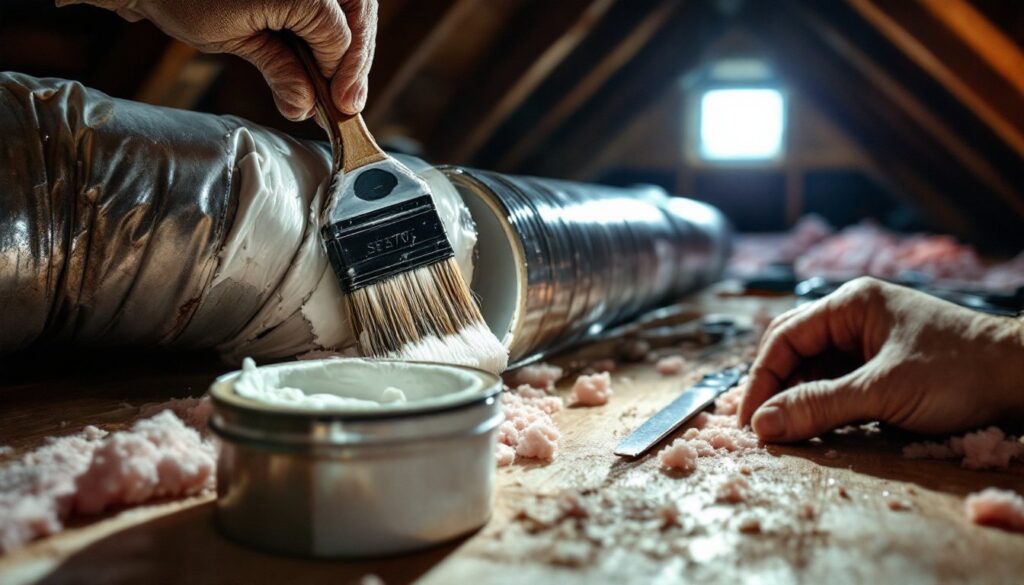
- Apply mastic sealant generously over the seam or joint using a disposable brush or gloved fingers. Spread it at least 2 inches on either side of the gap.
- Smooth the mastic to eliminate air pockets. It dries flexible and airtight.
- Allow mastic to cure per manufacturer instructions (typically 24 hours) before re-insulating or running the system.
For slightly larger gaps (¼ to ½ inch):
- Press fiber-mesh tape into the gap first.
- Cover the tape with a thick coat of mastic, feathering the edges.
Repair Larger Holes and Tears
For damage exceeding 2 inches or torn flex duct:
- Cut a patch from sheet metal or aluminum flashing, making it 3 inches larger than the hole in all directions.
- Position the patch over the hole and secure it with self-tapping screws spaced every 2 inches around the perimeter.
- Seal all edges with mastic or foil tape, overlapping onto both the patch and the duct surface by at least 1 inch.
- For flex duct, replace the entire damaged section if the tear is extensive. Cut out the bad section with a utility knife, slide a sheet-metal connector into both cut ends, and secure with adjustable worm-drive clamps. Wrap all joints with foil tape.
Re-Insulate
Conditioned-air ducts running through unconditioned spaces lose efficiency without insulation.
- Once sealant is fully cured, wrap repaired sections with duct insulation (R-6 minimum). Overlap seams by 2 inches and secure with foil tape.
- If existing insulation is in good shape, reattach it with wire or zip ties.
Test Your Work
- Restore power and run the system.
- Recheck sealed areas by hand for escaping air. If you feel airflow, add another layer of mastic or foil tape.
- Monitor your utility bills over the next month. A successful repair typically reduces costs by 10–20% depending on the severity of the original leaks.
According to recent cost data, homeowners spend $450–$2,000 to repair existing ductwork professionally, but tackling accessible leaks yourself keeps costs under $100 in materials.
When to Call a Professional
Some situations exceed DIY capabilities or carry risks that outweigh the savings.
Inaccessible ducts inside walls, ceilings, or under slab foundations require specialized tools, camera scopes, aerosol sealants, or blower-door testing, that pros use routinely.
Extensive mold growth inside ducts poses health risks. Professionals have containment protocols and antimicrobial treatments. Don’t spread spores throughout your home by disturbing contaminated ducts.
Major redesigns or additions that involve resizing ductwork, adding new branch lines, or relocating registers require load calculations to maintain balanced airflow. Manual J and Manual D calculations ensure proper sizing.
Asbestos-wrapped ducts in older homes (pre-1980s) must be handled by licensed abatement contractors. Disturbing asbestos insulation releases carcinogenic fibers.
Permit requirements vary by jurisdiction. Some localities require permits for duct modifications exceeding a certain scope. Check with your building department before tackling large projects.
If you’re unsure whether a repair is safe or feasible, consult a licensed HVAC contractor. Many offer diagnostic services for a flat fee and can identify problems you might miss. Resources like Angi help compare contractors and read verified reviews.
For routine duct cleaning after repairs, especially if dust or debris entered the system, professional equipment does a more thorough job than household vacuums.
Preventing Future Duct Problems
Proactive maintenance extends duct life and keeps efficiency high.
Inspect accessible ductwork annually. Schedule this during spring or fall when you’re less reliant on heating or cooling. Look for new gaps, sagging sections, or insulation damage.
Replace HVAC filters on schedule (every 1–3 months depending on filter type). Clogged filters increase static pressure, stressing duct seams and connections.
Control moisture in attics and crawlspaces. Use vapor barriers, ensure proper ventilation, and repair roof leaks promptly to prevent condensation and corrosion.
Secure stored items away from ductwork. A single misplaced box can crush flex duct or dislodge a joint.
Pest-proof entry points. Seal gaps where ducts penetrate walls or floors with spray foam or metal flashing. Set traps in attics and crawlspaces if you notice rodent activity.
Upgrade old flex duct proactively. If your system is approaching 15 years old and you’re planning attic work anyway, replacing aging flex duct during reroof or insulation projects avoids emergency repairs later.
Consider a duct-leakage test if you’re remodeling or notice persistent efficiency issues. HVAC contractors use blower-door tests and duct-leakage measurements (reported in CFM25) to quantify losses. A tight duct system leaks less than 10% of airflow.
DIY guides on sites like Family Handyman offer additional seasonal maintenance checklists to keep your entire HVAC system running smoothly.
Conclusion
Repairing HVAC ducts restores comfort and cuts energy waste without requiring a major investment or advanced skills. Most leaks respond well to mastic, foil tape, and a little patience tracking down problem areas. The improvements show up immediately in more even temperatures and quieter operation, with long-term savings on utility bills validating the effort.