Table of Contents
ToggleWater dripping from the ceiling at 2 a.m. or discovering a dark stain spreading across drywall during a rainstorm, these are the moments no homeowner wants to face. Roof leaks don’t wait for convenient timing, and the damage compounds by the hour. Whether it’s a missing shingle after high winds or a compromised flashing joint, acting quickly can mean the difference between a manageable repair and a major insurance claim. This guide covers the immediate steps to contain emergency leaking roof repair situations, locate the source, apply temporary fixes, and know when to call for professional help.
Key Takeaways
- Immediate damage control—moving furniture, containing water in buckets, and documenting everything with photos—is critical when you discover an emergency roof leak repair situation to prevent structural decay and mold growth.
- Most roof leaks originate at flashing failures around chimneys, vent pipes, and skylights rather than shingles themselves; inspect the attic during rain and trace water trails uphill to pinpoint the leak source.
- Temporary fixes like heavy-duty tarps (minimum 6-mil thickness) and roofing cement work for short-term containment, but require proper anchoring with 2×4 lumber to avoid creating new penetration points.
- Call a professional roofer immediately for roof pitches exceeding 6/12, structural damage, complex flashing repairs, or if your roof has an active manufacturer warranty, as DIY work can void coverage.
- Document the leak’s cause—wind damage, fallen tree limbs, or hail—to strengthen insurance claims, and get at least three written contractor estimates that itemize materials, labor, and permit handling before scheduling permanent repairs.
Immediate Steps to Take When You Discover a Roof Leak
The first priority is damage control inside the home. Water intrusion accelerates structural decay, promotes mold growth, and ruins insulation, drywall, and flooring.
Move furniture and valuables away from the affected area. Clear a 6-foot radius if possible, water can travel along joists or rafters before dripping, so the visible leak may not sit directly beneath the roof penetration.
Contain the water. Place a bucket, plastic bin, or even a trash can under the drip. If water’s pooling on a bulging section of ceiling drywall, puncture the lowest point with a screwdriver to create a controlled drain. It sounds counterintuitive, but letting water pool inside drywall causes more damage than a small release hole you can patch later.
Shut off electricity to affected rooms if water’s near light fixtures, outlets, or ceiling fans. Flip the breaker, don’t just rely on wall switches. Water and electricity are a dangerous combination, and roof leaks often track along wiring conduits.
Document everything with photos and video before touching anything. Capture the interior damage, visible water trails, and (if safe) exterior roof conditions. Insurance claims move faster with clear documentation, and contractors can assess scope remotely if weather prevents immediate site visits.
Reduce further intrusion by placing towels or absorbent material around the leak perimeter. This won’t stop the problem, but it buys time while you assess next steps. Check attic spaces if accessible, sometimes you can temporarily divert water flow with tarps or buckets placed on attic flooring before it reaches living spaces.
How to Locate the Source of Your Roof Leak
Water rarely enters where it appears inside. It can travel 10 feet or more along roof sheathing, rafters, or underlayment before finding an exit point through your ceiling.
Start in the attic during active rain if it’s safe to access. Bring a flashlight and look for water trails on the underside of roof decking. Follow the path uphill, water flows downward, so trace the wet streak toward the ridge. Mark the spot with chalk or a piece of tape.
Inspect roof penetrations first. About 90% of leaks originate at flashing failures around chimneys, vent pipes, skylights, or where two roof planes meet (valleys). Flashing is the thin metal or rubberized material that seals these joints, and it’s more vulnerable than shingles themselves.
Measure the leak’s position relative to fixed features, say, 8 feet from the north wall and 12 feet from the chimney. Translate those measurements to the exterior roof. This triangulation method narrows your search area to a few square feet.
Check for missing, curled, or cracked shingles in the suspect zone. Asphalt shingles become brittle after 15–20 years, especially on south-facing slopes with high sun exposure. Wind-driven rain can infiltrate under damaged shingle edges even if the roof looks intact from the ground.
Look for ice dam evidence if the leak appeared during winter or early spring. Ice dams form when heat escaping through inadequate attic insulation melts snow on the roof. Water refreezes at the eaves, creating a dam that forces meltwater under shingles. You’ll see icicles or ice ridges at the roof edge.
Use a garden hose test if you can’t find the source and weather permits. Have someone inside the attic while you systematically soak small roof sections for 5-minute intervals, starting downslope of the suspected area. Work your way up. When the spotter sees water intrusion, you’ve found the entry point. This test requires patience but delivers precise results when DIY repair tutorials don’t quite match your specific situation.
Temporary DIY Fixes to Stop a Roof Leak Quickly
Temporary repairs won’t replace proper roofing work, but they prevent cascading damage until permanent fixes are feasible. Prioritize safety, wet roofs are treacherous, and working at height without fall protection is a leading cause of DIY injuries. If the roof pitch exceeds 6/12 (6 inches of rise per 12 inches of run), conditions are wet, or you’re uncomfortable with heights, stop and call a professional.
Using Tarps and Plastic Sheeting for Emergency Coverage
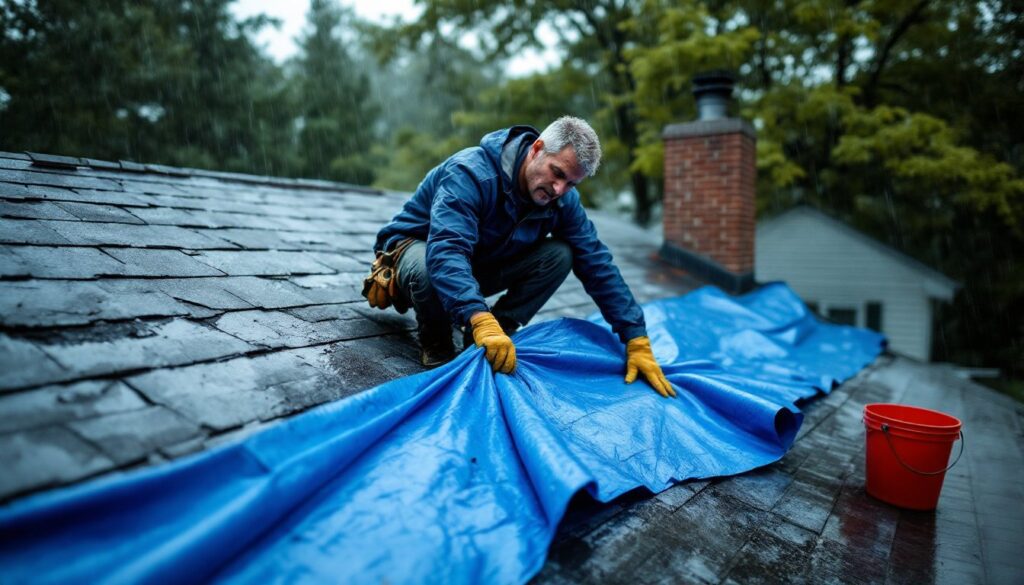
Heavy-duty poly tarps (minimum 6-mil thickness, preferably 10-mil) provide the fastest broad-area coverage. Blue poly tarps are common but UV-resistant silver or brown tarps last longer if the temporary fix needs to hold for weeks.
Extend the tarp at least 4 feet beyond the leak area in all directions, water can migrate under inadequate coverage. Position the top edge over the roof ridge if possible, so water flows over the tarp rather than under it.
Anchor the tarp with 2×4 lumber sandwiched around the edges, not just with loose sandbags or bricks. Roll the tarp’s upslope edge around a 2×4, secure it with screws or nails into the board itself (not through the tarp into the roof), then weight or tie down the remaining edges. Placing fasteners through the tarp into shingles creates new penetration points that will leak later.
Avoid letting tarps flap in wind, friction abrasion damages shingles rapidly. Secure all edges and consider adding intermediate anchor boards every 6–8 feet on large installations.
If wind threatens to tear tarps loose, create “dead men” anchors: fill buckets with sand or gravel, tie ropes to the handles, run the ropes over the tarp and anchor boards. The weight holds without roof penetration. This method works well on low-slope roofs where you can safely position buckets.
Applying Roofing Cement and Sealant as a Quick Fix
Roofing cement (also called plastic cement or roof mastic) works for small leaks around flashing, nail pops, or cracked shingles. It comes in caulk-tube or trowel-grade tub forms. Trowel-grade provides better coverage for areas larger than a deck of cards.
Clean the area before applying, brush away debris, leaves, and loose granules. The surface should be dry for best adhesion, though some emergency formulas tolerate damp conditions. Check the product label.
Apply a 1/4-inch-thick layer extending 2–3 inches beyond the damaged area. For lifted shingle edges, apply cement underneath, press the shingle flat, then add a bead along the edge. Weight it with a brick for 15 minutes.
Roofing tape (rubberized or butyl-based) offers a faster alternative for minor leaks if conditions are dry. Clean the surface, cut the tape to size with 2-inch overlap beyond the damage, press firmly starting from the center and working outward to eliminate air bubbles. This method works particularly well on metal roofing seams or small flashing gaps.
For vent pipe flashing failures, remove the rubber boot if it’s cracked, clean the pipe, apply a thick bead of roofing cement around the base, and press the boot back in place. If the boot’s too deteriorated, you can fashion a temporary seal with rubberized tape wrapped around the pipe and overlapping onto the flashing by 3 inches.
Don’t use regular caulk or construction adhesive, they’re not formulated for UV exposure, thermal cycling, and water immersion. Roof-specific products contain asphalt or polymer compounds that remain flexible through temperature swings.
Note that many home improvement cost guides estimate temporary fixes at $150–$400 if you hire out, but DIY material costs typically run $30–$100 depending on tarp size and sealant quantity. Permanent repairs obviously cost more and depend heavily on leak extent and roof type.
When to Call a Professional Roofer Instead of DIY
Some situations demand licensed expertise, and attempting DIY repairs can void warranties, violate codes, or create liability issues.
Call immediately if:
- The roof pitch exceeds 6/12 or features multiple levels and complex geometry. Falls from roofs above 10 feet carry high fatality risk without proper harness systems and anchor points.
- Structural damage is visible, sagging roof planes, cracked rafters, or areas that feel spongy underfoot indicate compromised sheathing or framing that requires engineering assessment.
- The leak involves the chimney, skylight, or valley flashing. These intersections require proper layering sequences and soldering (for metal flashing) that most DIYers lack the tools and skills to execute correctly.
- Multiple leaks appear simultaneously, suggesting systemic failure like blown-off ridge caps, widespread shingle loss, or underlayment deterioration.
- You’re dealing with materials beyond asphalt shingles, slate, tile, metal panel, or flat EPDM/TPO roofs each require specialized techniques and often void manufacturer warranties if modified by unlicensed individuals.
- The home has an active roof warranty. Many warranties stipulate that only certified contractors can perform repairs, and DIY work terminates coverage.
Building codes and permits: Emergency tarping typically doesn’t require permits, but permanent roof repairs usually do in most jurisdictions. The International Residential Code (IRC) governs roof construction standards including deck thickness (minimum 7/16-inch OSB or 1/2-inch plywood for rafters 24 inches on center), underlayment type, and flashing details. Permit inspections verify these standards.
Insurance considerations: Most homeowner policies cover sudden leak damage but exclude deferred maintenance. If your roof’s beyond its service life (20–25 years for standard asphalt shingles), insurers may deny claims or depreciate payouts. Document the event’s suddenness, wind damage, fallen tree limbs, or hail, to strengthen your claim.
Professional roofers carry liability insurance and workers’ compensation, protecting you if someone’s injured on your property. They also spot related issues invisible from the ground, like inadequate attic ventilation that’s cutting shingle lifespan by years. When researching contractors, check credentials through service provider reviews or similar platforms that verify licensing and customer feedback.
Get at least three written estimates for non-emergency work. Quotes should itemize materials (shingle brand, underlayment type, flashing material), labor, disposal fees, and timeline. Ask if they’ll handle permit applications, many contractors include this in their bid.
Conclusion
Emergency roof leaks test every homeowner’s composure, but methodical action limits damage and costs. Contain interior water intrusion first, locate the source with patience, and apply temporary fixes appropriate to the failure type. Know your limits, roofing work is inherently risky, and complex repairs justify professional intervention. The investment in a quality permanent repair protects your home’s envelope, maintains insurance coverage, and prevents the much larger expense of structural remediation down the road.